Checking the weather every morning might seem like a small task, but automating it can save time and make your daily routine smoother.
In this guide, you'll learn how to build a simple automation using Make (formerly Integromat), OpenWeather, and Telegram. Once it's set up, you'll receive automatic weather updates directly in Telegram without lifting a finger.
No coding required.
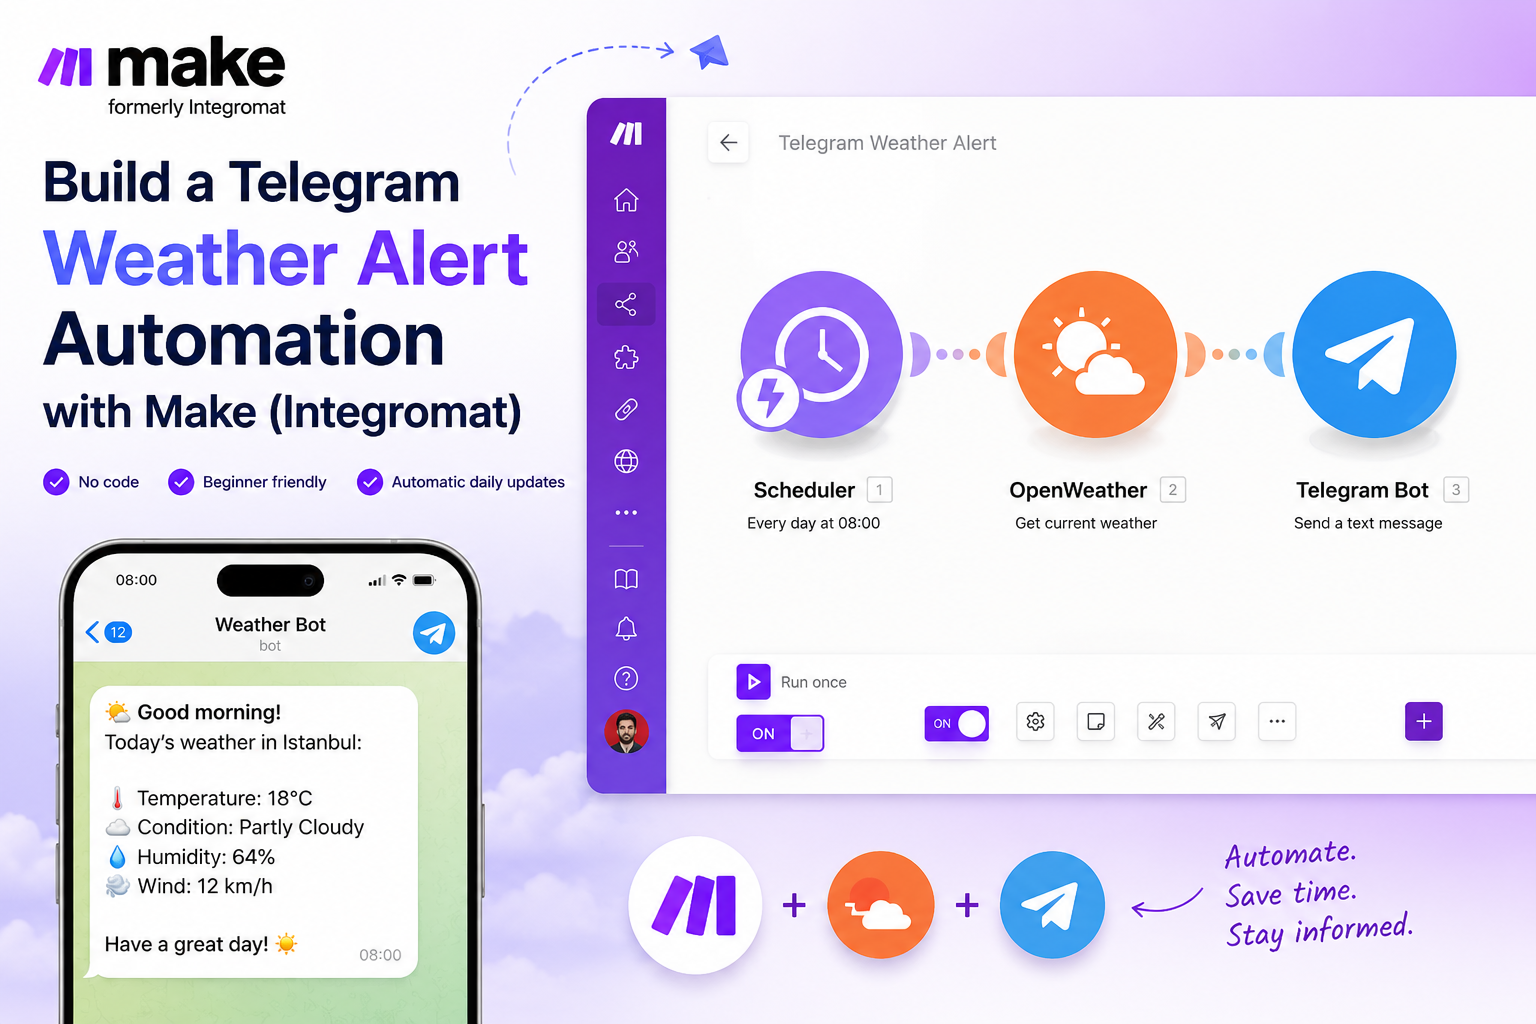
What This Automation Does
The workflow is simple:
- Make runs on a schedule.
- OpenWeather provides the latest weather data.
- Telegram sends the weather report to you automatically.
For example, every morning at 8:00 AM, you could receive a message like:
Good morning!
Today's weather in Los Angeles: 18°C, Cloudy.
Have a great day!
This is a great beginner automation project because it teaches the fundamentals of workflow automation while creating something genuinely useful.
What You'll Need
Before we begin, make sure you have:
- A Make account
- A Telegram account
- A Telegram bot
- An OpenWeather API key
- A city you want to monitor
Step 1: Create a Telegram Bot
First, you'll need a bot that can send messages.
Open Telegram and search for:
BotFather
Start a conversation and send:
/newbot
BotFather will ask for:
- A bot name
- A bot username
Example:
Bot Name:
Weather Reminder Bot
Username:
weather_reminder_bot
After creating the bot, BotFather will provide a token.
It will look something like:
123456789:ABCDEFxxxxxxxxxxxxxxxxxxxx
Save this token somewhere safe because you'll need it later inside Make.
Step 2: Start a Conversation With Your Bot
Before the bot can send messages to you, Telegram requires you to initiate the conversation.
Search for your bot.
Click:
Start
Or send:
/start
This step is often forgotten by beginners and causes message delivery problems later.
Step 3: Create a New Scenario in Make
Log into Make.
Click:
Create a New Scenario
The first module should be:
Scheduler
This determines when the automation runs.
For example:
- Every day at 8:00 AM
- Every 6 hours
- Every Monday morning
For this tutorial, choose:
Every Day at 8:00 AM
Step 4: Add OpenWeather
Next, we need weather data.
Add a new module.
Search for:
OpenWeather
Select:
Get Current Weather
You'll be asked for:
- API Key
- City
- Units
Example:
City:
Los Angeles
Units:
Metric
This ensures temperatures are returned in Celsius.
Step 5: Find Your Telegram Chat ID
To send messages, Telegram needs to know where to send them.
The easiest method is using Make itself.
Add a Telegram Bot module.
Choose:
List Updates
Then send another message to your bot:
/start
Return to Make and click:
Run Once
Open the result.
Look for:
chat → id
Example:
123456789
This number is your Chat ID.
Copy it.
You'll use it in the next step.
Step 6: Add the Telegram Message Module
Now add another Telegram Bot module.
Select:
Send a Text Message
Configure:
Connection:
Your Telegram Bot
Chat ID:
The Chat ID you copied
Message Text:
Good morning!
Today's weather in Los Angeles:
Temperature: {{temperature}}°C
Condition: {{weather_description}}
Have a great day!
Map the temperature and weather description fields from the OpenWeather module.
Make allows you to select these values directly from previous modules.
Step 7: Test the Automation
Before activating the workflow, test everything.
Click:
Run Once
Check Telegram.
If the message arrives, congratulations — your automation works.
If it doesn't, verify:
- Bot token is correct
- You started the bot using /start
- Chat ID is correct
- OpenWeather API key is valid
- City name is spelled correctly
- Modules are connected properly
Most issues come from one of these settings.
Step 8: Activate the Scenario
Once your test succeeds:
Turn Scheduling ON
Then activate the Scenario.
Your automation will now run automatically according to your schedule.
Make the Message More Useful
Instead of sending only temperature, you can create richer notifications.
Example:
Good morning!
Weather update for Los Angeles:
Temperature: 18°C
Condition: Cloudy
Humidity: 64%
Wind Speed: 12 km/h
Tip: You may want to bring a light jacket today.
This feels more like a personal assistant than a basic weather alert.
Useful Upgrades You Can Add Later
Once the basic workflow works, you can improve it.
Ideas include:
Rain Alerts Only
Send a message only when rain is expected.
Extreme Temperature Warnings
Alert yourself when temperature exceeds a certain value.
Multiple Cities
Monitor several locations simultaneously.
AI-Powered Recommendations
Use ChatGPT to generate personalized advice based on weather conditions.
Example:
"It's going to be rainy today. Consider carrying an umbrella and leaving a few minutes earlier for work."
Save Data to Google Sheets
Create a daily weather log automatically.
Send Reports to Notion
Build a personal weather dashboard.
Common Beginner Mistakes
Here are the most common issues people encounter:
- Forgetting to send /start to the bot
- Using the bot token instead of Chat ID
- Incorrect OpenWeather API key
- Wrong city name
- Not testing with Run Once
- Timezone configuration issues
Timezone settings are especially important.
If Make is using the wrong timezone, your "8:00 AM" alert might arrive at an unexpected hour.
Always verify your scenario's timezone settings.
Final Thoughts
This Telegram weather alert automation is one of the best beginner projects for learning Make.
Why?
Because it teaches the three core concepts behind almost every automation:
- A trigger starts the workflow.
- Data is collected from a source.
- The data is sent somewhere useful.
Once you understand this pattern, you can build far more advanced automations such as:
- AI news alerts
- Content idea generators
- Daily reports
- Task reminders
- Social media notifications
- Market monitoring systems
Start simple, make it work, then improve it over time.
That's the fastest way to learn automation.